15.3 Re-name levels of a factor (or indicator)
There are many situations where it would be very handy to be able to change the names of levels of a factor (or to change the names of groups for an indicator). We often need to tweak the names of levels of factors. For example,
- The names are too long and you want to shorten/abbreviate them so that they are easy to see as labels on an ordination plot. For example, you have levels of 'Berghan Point' and 'Home Point', and you want to change them to 'B' and 'H'.
- The factor has levels that are quantitative (e.g., such as depth zones), but the names are not strictly numeric (e.g., maybe the levels are named '50-100 m', '100-200 m', '200-300 m', etc.). You might, however, really want numeric factor level names so you can analyse the factor as ordered in an ANOSIM, put depth trajectories on ordination plots, etc.
- You have discovered that not all factor levels matter, and so you want to combine 2 or more factor levels into an amalgamated (single) factor level. For example, maybe you originally have levels of 'Low', 'Medimum-Low', 'Medium', and 'High', but later decide that the first two levels are not actually significantly different, so you want to combine those two and change the names so that you just have 'L', 'M' and 'H'.
- You have taken data through time (say, every 2 months) at your sites, and your labels for this temporal factor look like this: 'Jan-2001', 'Mar-2001', 'May-2001', etc., but you want to treat these simply as sequential time-points in your plots, e.g., 'T1', T2', 'T3', etc.
It would be very laborious to have to go through the process of re-naming the factor-level names for every single sample in the full worksheet, and this process would also be highly prone to error.
In PRIMER 8, all you need to do is click Edit > Factors, click on the factor whose level names you want to change, and then click the 'Rename Levels...' button ( ). The resulting dialog lets you nominate the new names for the factor levels (just type them in), and then you can get on with your work.
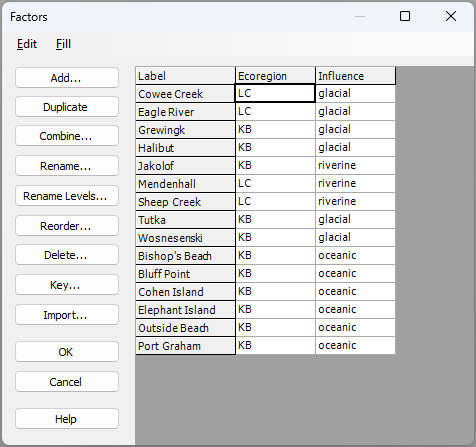
For example, for the size-class data for mussels from several sites in the Gulf of Alaska (the data file is 'Gulf_of_Alaska_mussels.pri', located in the folder 'Examples_P8' > 'Gulf_of_Alaska_mussels'), we may wish to abbreviate the names of the ecoregions so that they are shorter, making them easier to see in ordination plots (Fig. 15.5).
![06c.Factors_rename_levels_mussels[i].png](https://learninghub.primer-e.com/uploads/images/gallery/2025-12/06c-factors-rename-levels-mussels-i.png)
Fig. 15.5 Dialog windows showing the action of changing the names of levels for the factor of 'Ecoregions' for the Gulf of Alaska mussel size-class dataset: from 'Lynn Canal' to 'LC' and from 'Kachemak Bay' to 'KB'.
The resulting factor information (after changing the level names for 'Ecoregion', as shown above) looks like this:
As an aside, if you wanted to retain the original level names in your data sheet as well, then you need first to duplicate the original factor (using the 'Duplicate' button), rename the factor itself (using the 'Rename...' button; for example, the abbreviated names could be held in a factor called 'Ecoreg'), then create new level names for that duplicated factor (using the 'Rename Levels...' button) to whatever new names you wish.
You can compare the metric MDS plot of the sites (based on Manhattan distances among cumulative percentages of standardised size-classes of mussels) when Ecoregion factor-level labels have long names vs the same plot with short names (see below).
![06f.mMDS_mussels_full_names[i].png](https://learninghub.primer-e.com/uploads/images/gallery/2025-12/06f-mmds-mussels-full-names-i.png)
![06g.MDS_mussels_short_names[i].png](https://learninghub.primer-e.com/uploads/images/gallery/2025-12/06g-mds-mussels-short-names-i.png)
Finally, note that this same re-naming tool is also available under Edit > Indicators....