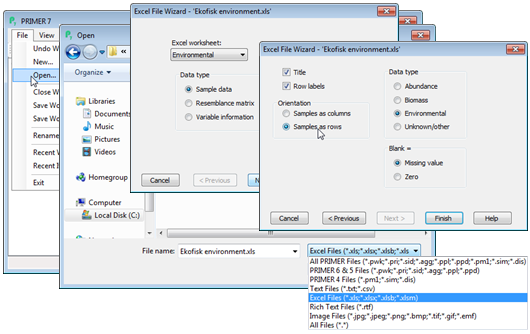
Wizard for input data
File>Open gives the same Open dialog box as previously but, importantly, the drop down menu on the bottom right of this dialog should now be used to select files of type: Excel Files (*.xls, *.xlsx, ..), otherwise the Excel file will not be visible in the file listing. Click on a filename and the Open button generates a ‘wizard’ which guides the user through the choices that must be specified. On the first dialog box, specify which Excel worksheet to use from the file, selected by name, and then what Data type: •Sample data (a rectangular array of samples $\times$ variables or variables $\times$ samples); •Resemblance matrix (a triangular matrix of pairwise similarities/dissimilarities/distances/ranks/ correlations and even pairwise ANOSIM R statistics – PRIMER will itself generate a wide range of these from sample data sheets but it might, for example, be required to input a specialised measure computed by other software into the PRIMER routines); •Variable information (this is a slightly broader category in PRIMER 7 which is still, however, mainly used to hold taxon information on each species, referred to previously as aggregation files, in which species are linked to their taxonomic hierarchy of genus, family, order, etc.).
On the second dialog box, make sure the Title box is checked (the default option) if there is a separate title line in the top left cell (A1) of the Excel file. Failing to uncheck this box when there is no additional title line is likely to be the commonest source of problems when reading an Excel sheet into PRIMER, the first row of the data matrix then being mistaken for the column labels (also, failing to check the box when there is a title will result in blank input sheet). Similarly there is a check box for the presence of row labels, e.g. species names (which is the default since they are almost always present). Other choices in this dialog specify whether the Samples are to be taken as columns or rows, and whether the data is of Abundance, Biomass, Environmental or Unknown/ Other type. This Data type designation is not crucial, but it does allow PRIMER 7 to select natural defaults for analysis choices, e.g. of resemblance coefficient, dependent on specified data type.
To input the above Ekofisk environmental matrix from the C:\Examples v7\Ekofisk macrofauna directory, take File>Open>(File name: Ekofisk environmental.xls)>Open>(Excel worksheet: Environmental) & (Data type•Sample data)>Next>(✓Title) & (✓Row labels) & (Orientation •Samples as rows) & (Data type•Environmental) & (Blank=•Missing value)>Finish, as shown:

